Post by ~CrAzY~™ on Jan 17, 2007 20:56:28 GMT -5
I'll show you how to make a userbar image with gloss and gradients.
I use the font bitDust2 in this tutorial.
Step 1) Make a new image, 400px wide and 20 px high.

Step 2) Using the paint bucket tool, fill it with any color.

Step 3) Double Click the layer in the layers box to open up the blending styles. Give it a gradient overlay. (#01589c and #008aff)

Step 4) Create a New Layer. Using the elliptical marquee tool, select the top half of the canvas.

Step 5) Using White (#FFFFFF) fill the selection using the paitn bucket tool. Now hit CTRL+D to deselect the canvas.

Step 6) Now lower the opacity of this layer to 25% to give it a gloss look.

Step 7) Now, go to File --> New and make a new image, 3px wide and 3px high.

Step 8) Get out your pencil tool. Set the brush to a hard (100%) round brush, 1px in diameter. Use it to make 3 black diagonal dots on the canvas. (Zoom all the way in to 1600% to help)

Step 9) Go to Edit --> Define Pattern. Name your pattern and hit OK. You have now saved the pattern so you can use it whenever needed.
Step 10) Go back to your userbar Image File. Create a New Layer. Get out your paint bucket tool. At the top where it says Foreground, change it to pattern and select the pattern you just made from the drop-down next to it.

Step 11) Now click anywhere on the canvas to fill it with this pattern. Move the layer with the pattern underneath the layer with the white gloss and change it's opacity to around 40%.

Step 12) Now, click on the text tool. Change the settings to BitdustTwo, 8px, and none.

Step 13) Use the Text Tool to type out whatever words you want on the userbar. Use the move tool to center them and move them to the right. Have caps lock on while typing so all the letters are capitol.

Step 14) Open the blending styles for the layer. Give it a 1px black stroke.

Step 15) Open up the image/icon you want to put on the userbar. Resize it if needed and hit CTRL+A, then CTRL+C to copy it. On the userbar file, Go to Edit--> Paste (CTRL+V). Now move the image to the left corner. You may have to use SHIFT+CTRL+C if you have layers in the image file, so it copies everything visible.

Step 16) Create a new Layer. Set the fill type to Foreground and fill this layer with any color. Set the fill to 0%. Open up the style options for the layer and give it a 1px, #000000, inner stroke.

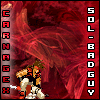
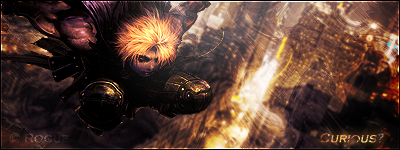
And you're done! With a little playing around, you could even make a kick-ass userbar like our proud member userbars.
(hint: Reversed Grad, straight Gloss, different colored gradient, reflected text... )
)
Remember, play around with stuff like the line opacity, the gradient direction and shades, and the width of the canvas.
Post your userbars when you follow this tutorial!
I use the font bitDust2 in this tutorial.
Step 1) Make a new image, 400px wide and 20 px high.
Step 2) Using the paint bucket tool, fill it with any color.
Step 3) Double Click the layer in the layers box to open up the blending styles. Give it a gradient overlay. (#01589c and #008aff)
Step 4) Create a New Layer. Using the elliptical marquee tool, select the top half of the canvas.
Step 5) Using White (#FFFFFF) fill the selection using the paitn bucket tool. Now hit CTRL+D to deselect the canvas.
Step 6) Now lower the opacity of this layer to 25% to give it a gloss look.
Step 7) Now, go to File --> New and make a new image, 3px wide and 3px high.
Step 8) Get out your pencil tool. Set the brush to a hard (100%) round brush, 1px in diameter. Use it to make 3 black diagonal dots on the canvas. (Zoom all the way in to 1600% to help)
Step 9) Go to Edit --> Define Pattern. Name your pattern and hit OK. You have now saved the pattern so you can use it whenever needed.
Step 10) Go back to your userbar Image File. Create a New Layer. Get out your paint bucket tool. At the top where it says Foreground, change it to pattern and select the pattern you just made from the drop-down next to it.
Step 11) Now click anywhere on the canvas to fill it with this pattern. Move the layer with the pattern underneath the layer with the white gloss and change it's opacity to around 40%.
Step 12) Now, click on the text tool. Change the settings to BitdustTwo, 8px, and none.
Step 13) Use the Text Tool to type out whatever words you want on the userbar. Use the move tool to center them and move them to the right. Have caps lock on while typing so all the letters are capitol.
Step 14) Open the blending styles for the layer. Give it a 1px black stroke.
Step 15) Open up the image/icon you want to put on the userbar. Resize it if needed and hit CTRL+A, then CTRL+C to copy it. On the userbar file, Go to Edit--> Paste (CTRL+V). Now move the image to the left corner. You may have to use SHIFT+CTRL+C if you have layers in the image file, so it copies everything visible.
Step 16) Create a new Layer. Set the fill type to Foreground and fill this layer with any color. Set the fill to 0%. Open up the style options for the layer and give it a 1px, #000000, inner stroke.
And you're done! With a little playing around, you could even make a kick-ass userbar like our proud member userbars.
(hint: Reversed Grad, straight Gloss, different colored gradient, reflected text...
)Remember, play around with stuff like the line opacity, the gradient direction and shades, and the width of the canvas.
Post your userbars when you follow this tutorial!


 & Big Word Abuser..


 Nice tutorial Crazy